Wooden-Handled Bag Tutorial


When I made this project last month, I promised a tutorial. So here it is! The original purse belonged to my grandmother but I mostly remember my mother using it to hold her crochet projects. She recently passed it along to me, and I love those vintage "made in Canada" wooden handles, but the orange had to go. So I swapped it out for this gorgeous red Dear Stella print. If you want to make something similar, follow along! 

Obviously the wooden handles are quite specific, but they are certainly easy to find in thrift stores, craft supply stores or Etsy and all you would have to modify is the width.


You will need...
  • a pair of purse handles (mine were 12-1/2" long with 9-3/4" openings)
  • 1/2 yard of main fabric
  • 1/2 yard of lining fabric
  • thread
  • pins, scissors/rotary cutter, marking pen/pencil, sewing machine


With your fabric folded, square it up and cut the length to 16". Now measure your purse handles. You want the bottom to extend out a little, so cut to a width that is 4" inches longer than the handles (2" for each side). So, my piece was cut to 16 x 16-1/2".


To make the corners curved, I find it easiest to trace something in your house that makes a nice-looking curve. I used an old embroidery frame here, but a small plate works well too.


Trace the curve and cut. Then fold your piece in half lengthwise, trace the curve onto the opposite side and trim.


Now use that piece as a pattern to cut out your lining. Or vice versa, depending on which fabric you started with.


With right sides together, measure down 6" from the top and make a mark with either a pin or disappearing ink. Do this for both the left and right side and for both your main fabric and your lining. Then stitch around the purse with a 1/2" seam, between the marks.

Slide the lining inside the main fabric, right sides together and pin the two together along the 6" opening, as shown above. Stitch with a 1/4" seam.


Turn the bag right side out. Baste the main fabric and the lining together along the top of the bag. Fold the top down 1/2" and press.


Now feed the top through one of the handles, so that there is just enough room to stitch a 1/4" seam. Test it on your machine — the foot probably takes up more room than you think. Mark this sweet spot with a line. Measure it and duplicate it for the other side.


Now pin along that line and sew. It's always easier to sew in a straight line with a guide. So for this project, for my first seam I simply lined up the folded edge with the right side of my presser foot. On my machine, that results in a seam that is a little bigger than 1/4".


The gathers can be cumbersome. You will need to go slow, flattening out small sections at a time, shifting the handle along as you go.


I went over it again with an edge stitch, which gives it a more polished look.


And there you have it! A roomy bag for transporting your crafts. With the right fabric, it would make a fabulous purse too. 

Whatever you decide to make, I'd love to know, so please tell me all about it in the comments below. Feel free to ask me any questions you may have, as well. I'm sure all the instructions aren't perfectly clear to all.

Happy sewing!


Dear Edna Turns Five


Five years ago today, I posted my first apron for sale on Etsy! That can't be right, can it? Let me check again...

Yep. 2010. Five years! I was shocked that I lasted three months, so this seems like a pretty monumental milestone. This little business literally changed my life and it wouldn't be possible without the support and encouragement from all of you, my customers, blog readers, crafty community, friends and family. From the bottom of my heart, THANK YOU!

For the last couple weeks, I've been mulling over how to best celebrate and was coming up with nothing. Honestly, I was on the verge of letting the day pass by unannounced. But then the most perfect thing just happened. I had to cut some extra length off a new product I'm working on (hint hint) and the leftover piece divided perfectly into five. Kismet.

So... to thank you all for five fabulous years of business, I'm giving away five special anniversary-edition trivets!


I had some serious fun with this, quilting each one with a unique pattern. And at 8x10", they 're the perfect size for whatever you need them to be. Big coaster, small placemat, pot holder, whatever you like. I think I might have to make another one for myself, actually.


Here are the details. There will be five winners, each receiving one trivet. All you need to do to enter is sign up for my email newsletter. You'll also receive a 10% discount code on sign-up. The gifts just keep on giving, right? Anyone already signed up for my newsletter is automatically entered.

You can score a second entry by sharing the contest on facebooktwitter, or instagram with the hashtag #dearedna.

The contest will be open for 5 days (gotta keep with the theme). I'll announce the winners on Friday morning.

Good luck!


Emery Dress


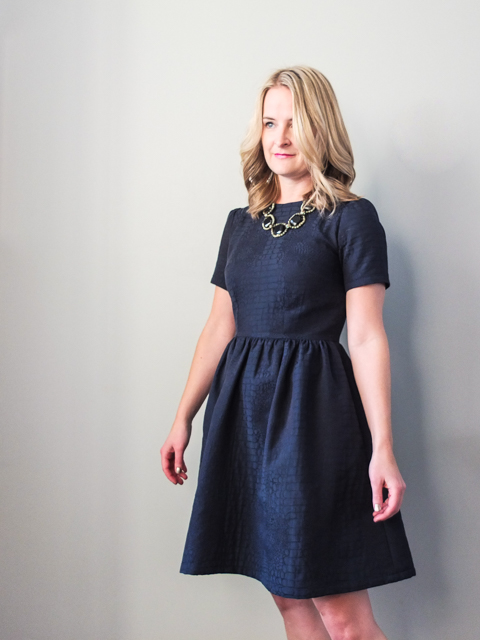
The Emery Dress pictures are here! If you follow me on Instagram, you'll know that I finished this dress in January, but coordinating a time when I would have my hair and makeup done and have time to take pictures took another two months. Not easily done, guys. Well, the stars aligned when Yen had a grand re-opening party (meaning I actually did my hair and makeup) on the same day that I had some spare time and the sun was shining. Praise the photo gods. Now to just set up the tripod and timer and run back and forth a million times. Ay ay ay. Props to all the fashion bloggers out there that do this multiple times a week. I don't know how you do it.

Ok. Rant over. Back to the dress. The dress. 


I love it! The pattern is by Christine Hayes and I have only good things to say about it. The instructions were easy to follow and it fit me like a glove with very few adjustments. I was worried about comfort because of the fitted bodice, but it's really comfortable. It's probably the most comfortable dress I own! No tugging and pulling, y'know? And, hey, it has pockets. Love pockets. 

I can see myself making many versions of this dress!


All that being said, this dress had a rocky start. It is actually my second version.

Initially I was stuck on the idea of this being plaid, mostly because of Amber's dress in Pendleton wool. So gorgeous. Plus, I had recently picked up this great plaid that you see below. I was well aware that it would be challenging to match up the pattern, but after reading Lladybird's "Matching Plaids Like a Boss" post, I was confident enough to give it a shot.

I failed.

First of all, the fabric itself was pretty badly skewed. I should've given up right then and there. But I soldiered on, so determined to make it work. The Tim Gunn curse. I spent hours painstakingly adjusting the skirt gathers so that the white stripes appeared to line up with the bodice. Then I turned it over. My heart sank. The mismatching on the back was horribly obvious. Another woman might just covered it with a cardigan. Not this woman.


I'm not going to lie, I shed a couple of quiet tears mourning my plaid dream. Funny how attached you can get to an idea. Then I spotted this navy snakeskin print on my shelf and knew it would look just as great as an Emery. 

And here's the best part: without stripes to deal with, I whipped it up in only one day! Well, a day and a half if you include hemming. That was extremely satisfying after all my previous struggles.


A quick word about the fabric. It's funny. It sewed like cotton, but melted like polyester (oops), and the underside had a sort of knit texture. Any guesses?


Here's a peak at the inside. Because I know sewists appreciate it. As you can see, I chose to serge instead of line and used bias binding at the neck. In retrospect, I would've hand-stitched the binding or used a thinner fabric to eliminate bulk and seam lines. 

It's a size 4 and the only adjustments I made were to take in the shoulder seams by 5/8", the shoulder darts by 1/4" and the hem by 2-1/2", all of which are pretty typical with everything I sew (or buy, for that matter). I couldn't make up my mind on the sleeve length, so I changed that a bunch of times too, so I lost track of the exact adjustments there.


All in all, I'm super happy with how it turned out and can't wait for the chance to show it off. I haven't been brave enough for tights just yet, but if this Spring-like weather keeps up, her time in the sun will be soon!


Shop Update: New Cosies


I can't think of anything more appropriate for the first shop update of 2015 than cosies! So if you're like me and struggling through this final leg of winter by leaning in to hibernation mode and consuming an excessive amount of caffeine in the process, fire up the kettle, because I've got the hot drinks covered. (Ha! I love a good pun.)

What I mean is, I've restocked my Etsy shop with a whole pile of new tea cosie and cup cosie prints. All are reversible, as usual, and guaranteed to keep your coffee and tea warm through your next House of Cards marathon. Check out the whole range here.

Treat yourself. You're almost there!